BlendSnow - 100% procedural realistic snow material for Blender Cycles (now with Asset Browser support)
A downloadable material
BlendSnow
BlendSnow is the realistic, powerful and affordable snow material for all 3D artists who use Blender. It is a simple to use but versatile nodegroup which you can append to any .blend file, and use with any geometry and scene.
Buyers of this nodegroup will get all future updates for free.
Features:
- 100% procedural node set-up (no image textures, infinite resolution!)
- Highly detailed material, which will look good from any distance
- Easily customizable, the parameters can all be intuitively changed from the main node
- Supports extra displacement/height maps, which you can use to carve the snow, modify the terrain, make footprints, add more detail etc. The possibilities are endless, and the cover image makes heavy use of this feature (the footprints, the text and the detail around it are part of a displacement map)
- Very lightweight, the nodes (without the displacement map used in the logo) are less than one MegaByte
Installation and set-up:
Asset Browser method (recommended for Blender >3.0):
This new method makes use of Blender's new Asset Browser. The Asset Browser makes it easy to re-use assets between Blend files and is very useful for shaders like BlendSnow. The first thing you need to use the asset browser, is to set-up your asset library. This can be done by going to Edit > Preferences > File Paths:
There, click on the "+" sign on the Asset Libraries section and select any folder in your computer. This will be where you will store your assets, including BlendSnow:
Now, download the BlendSnow .blend file and save it in your assets folder. Now, whenever you open the Asset Browser, BlendSnow will be there. To use the material (the sphere in the Asset Browser), simply drag and drop it on any object, and Blender will apply the shader to it:
You can also drag and drop the BlendSnow node group to your shader editor to use it with an existing material:
And that's it for the install process, just keep in mind that the mesh has to be UV unwrapped and with an applied scale (the scale has to be set to 1.00).
Legacy append method (without Asset Browser):
If you are on Blender <3.0, or if you don't want to use the Asset Browser, you can use the append method, which is also simple. After downloading the blend file, you can save it anywhere. Next, open the project you want to add the snow to, and from the file drop down menu, select append:
In the append window, find the BlendSnow .blend file and open it. Inside the blend file, navigate to the NodeTree folder and append the BlendSnow nodegroup:
Once you have appended the node group, create and assign a new material to the mesh you want to apply the snow to and delete the Principled BSDF node, instead, press Shift+A and add BlendSnow where the Principled node was:
With that, BlendSnow was properly added to your .blend file.
Usage:
If you want to use displacement for your snow, which is highly recommended, set the displacement to displacement and bump under the Material > Settings panel:
Not only that, but for the material to be displaced properly there has to be enough geometry to work with. You could subdivide the mesh traditionally, but it's more recommended to use Blender's experimental Adaptive Subsurface Division modifier. To do that, firstly enable the experimental settings under the scene panel:
With that enabled, simply add in a Subdivision Surface modifier and check the Adaptive Subdivision box:
If you are using a plane or a similar mesh, it's important to extrude its sides downwards, otherwise you may face some graphical issues. Also make sure that the scale of the object is applied and that it is UV unwrapped:
And that is it for the default settings, but there's a lot more you can tweak in BlendSnow.
Node values and displacement maps:
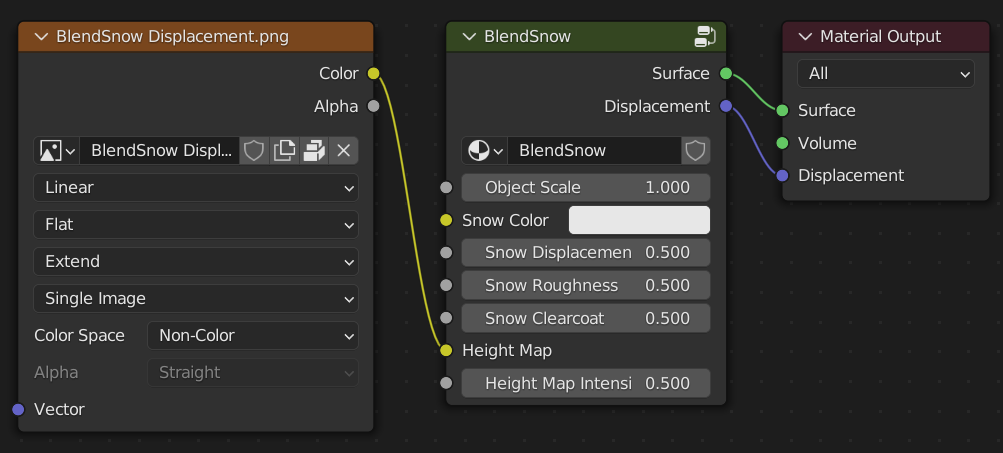
The node is simple and intuitive, but here's a breakdown of its values:
- Object Scale: the default scale was tested with a mesh that is 100x100m. If your scene is scaled differently, change this value accordingly. For example if I had a scene where everything is half of its real world size, I'd set the Object Scale value to 0.5.
- Snow Color: defines the base color of the snow material. You might want to set it to a more blue-ish tone to give a colder look to the snow, for example.
- Snow Displacement: this controls the intensity of the displacement of the material. For example higher values will give you stronger bumps.
- Snow Roughness: the roughness value of the snow is not uniform, but this value acts as a multiplier to the roughness range. Smaller values will make the snow more glossy (as if it were wet for example), while higher values will make it look more "dry".
- Snow Clearcoat: to mimic the reflectiveness of snow crystals, the material has some clearcoated dots, wihch will give the material some glints across the surface. The itensity of this effect can be controlled by changing this value.
- Height Map: if you have a displacement map, you can plug it here, which will displace the surface of the snow
- Height Map Intensity: this will change the intensity of the displacement caused by the height map from the previous input.
And that's it for the input values. It's important to know that due to the material relying on displacement maps, it might give unexpected results in Eevee, it is a material designed for Cycles. If you, as a customer or potential customer has any questions about the use of the nodegroup, feel free to reach me by e-mail, and I will help you as soon as possible:
You are allowed to use BlendSnow on your personal and commercial projects, as well as modifying it for your own uses (which include baking the material to use on Eevee, video-games and animations and editing the nodegroup). You may not redistribute BlendSnow or parts of it to third parties, modified or not. The sharing of baked textures is also not allowed.
Purchase
In order to download this material you must purchase it at or above the minimum price of $2 USD. You will get access to the following files:
Download demo